Homemade Butter Chicken (Murgh Makhani) – In the Crockpot Leave a comment
This perfectly spiced takeout-fakeout butter chicken recipe is an easy, dreamy dinner that you’ll be so glad you made. This recipe uses Greek yogurt or skyr (a type of thick strained yogurt that’s similar to Greek yogurt) to help achieve the perfect saucy chicken that is tender and flavorful right out of the slow cooker. If you’re wondering if this is too spicy or flavorful for little ones, fear not. The spices are spot-on in terms of replicating the Indian dish it inspired but the heat is very mild. Even my two-year-old licks his plate clean and asks for seconds.

Where does Butter Chicken Come From?
Butter Chicken, also known as murgh makhani, is a traditional comfort food dish originating in Delhi, India that’s made from chicken and a mildly spiced curry sauce. The signature thick, rich, and creamy sauce typically includes cream, yogurt, tomato paste, and fragrant spices. Butter Chicken, as its name implies, also contains butter to add some nice richness to the sauce. In this recipe, you dot cold butter pieces over the ingredients in the slow cooker so it melts into the sauce as it cooks … and a little goes a long way! If you want to take a deeper dive into the origin story behind this dish (and the lawsuit to determine who its original creators are, check out this 7-minute radio story ).
This version of this flavorful Indian dish is loaded up with veggies and made right in the slow cooker for ultimate preparation ease but I’ve also included directions for stovetop and Instant Pot to give you options.
Recipe Highlights! Crockpot Butter Chicken
Prep the recipe in just 20 minutes and let your crockpot do the rest!
A thick and creamy sauce that makes every bite delicious
Loaded up with nutritious veggies and lean protein
A great source of calcium
Contains fragrant spices with anti-inflammatory benefits
Makes enough for 8 servings (and the leftovers reheat well!)
Can be made with ingredients you probably already have on hand saving you a trip across town to the Indian grocery store
The perfect excuse to use fluffy naan bread as your utensil

⭐️⭐️⭐️⭐️⭐️ What Others Are Saying About This Recipe
“This was super easy, and smells amazing! It’s the best Butter Chicken recipe we’ve made so far. I was worried it wouldn’t have enough spice, but it was perfect for us.” – AJ
Tip from Dietitian Jess
My family loves this recipe but being a mom of teenagers means it’s sometimes hard to know when we’ll be home for dinner. The last thing I want to have to worry about is rushing home because dinner is ready in the crockpot so I prefer to make this Butter Chicken recipe in my Instant Pot. I like to prep the ingredients ahead of time (chop the vegetables, slice the chicken, and measure the spices) which cuts 15-20 minutes of the prep time. That way everything is ready to go when I’m ready to cook.
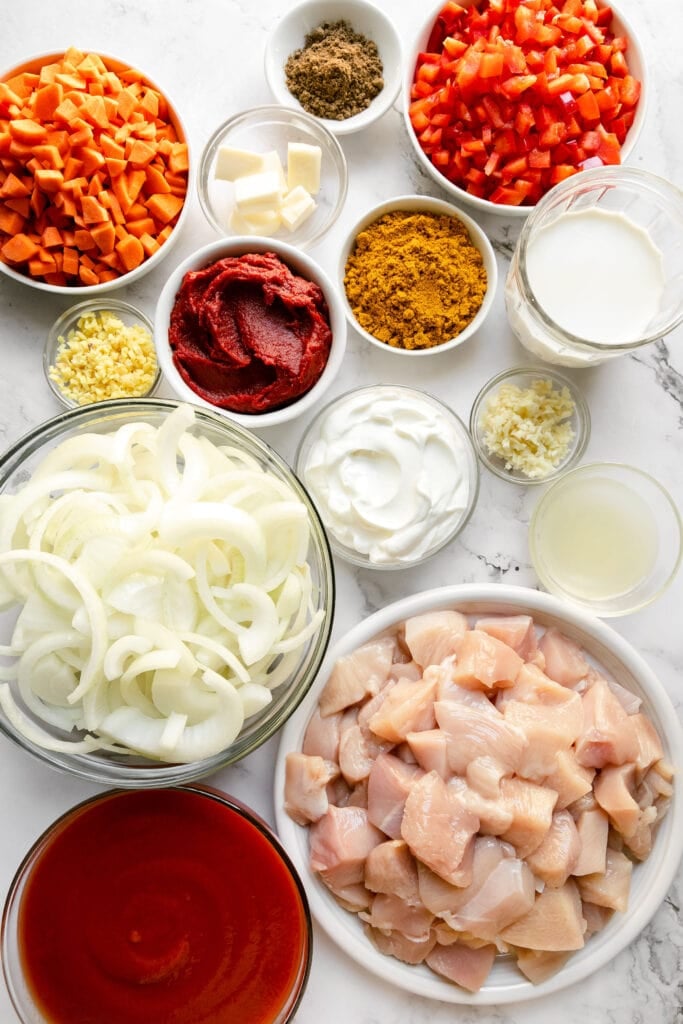
How to make Butter Chicken in the crockpot
Since you can make this recipe right in the crockpot, it comes together with ease and without a lot of extra dishes. Here are the quick steps to get it cooking:
Layer the onions in the slow cooker: In the crock of a 6-quart or 8-quart slow cooker, place the sliced onions.
Combine remaining ingredients and add to the slow cooker: In a large bowl, combine the chicken, bell pepper, carrots, tomato sauce, tomato paste, lemon juice, garlic, ginger, curry powder, garam masala, and salt; toss until well combined. Add the saucy chicken mixture to the slow cooker over top of the sliced onions.
Add the butter: Dot the pieces of butter over top of the mixture.
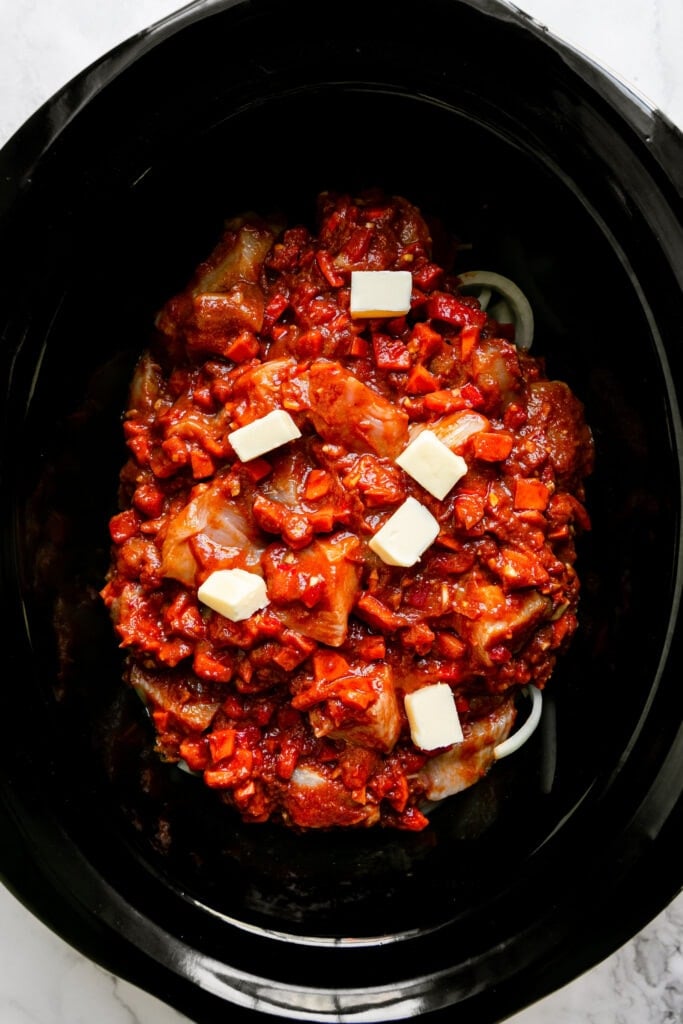
Slow cook on the low or high setting: Place the lid on the slow cooker. Cook on high for 4 ½ hours or on low for 6 ½ hours.
Add the yogurt and half-and-half: After the cooking time is up, remove the lid. Stir all ingredients until well combined, and turn off the slow cooker. When the liquid stops simmering and steaming (after 5-10 minutes), stir in the yogurt and the half-and-half. (NOTE: If you stir in the yogurt and half-and-half before letting the mixture cool down a little, it could curdle.)
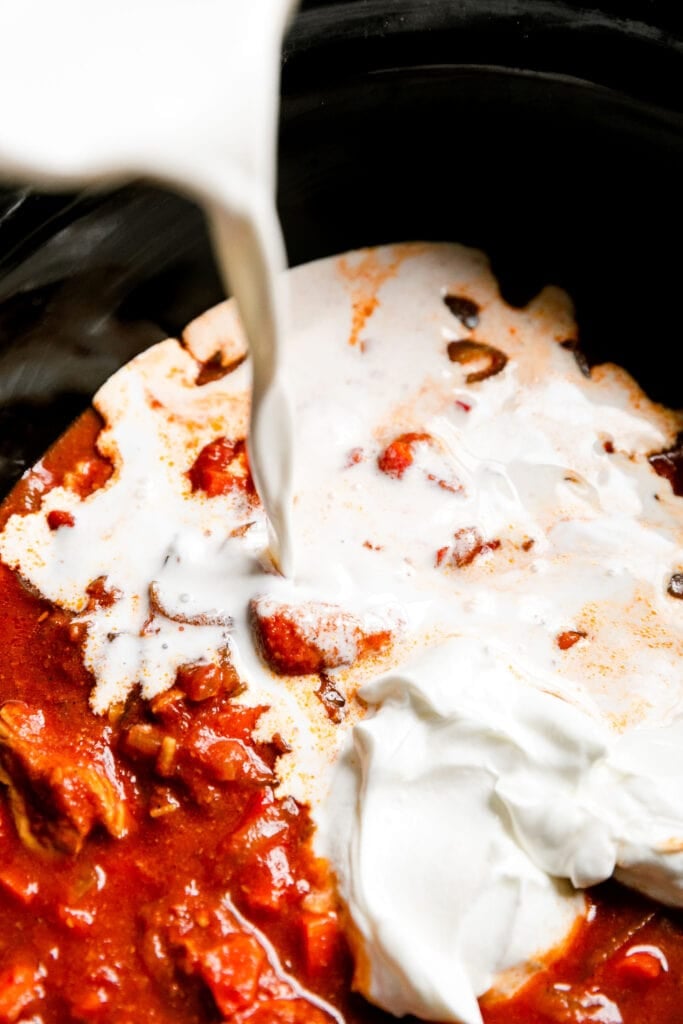
Garnish and serve: Serve butter chicken over hot cooked rice or cauliflower rice, and/or with naan bread. Garnish with chopped fresh cilantro, toasted sesame seeds, and a squeeze of lime.
For the complete directions and ingredient amounts, scroll down to the recipe card below. All of our recipes include the nutrition analysis, listing calories, protein, carbohydrates, fiber, sugar, sodium, and more per serving.
Recipe Video: How To Make Crockpot Butter Chicken
The Key to That Perfect Creamy Sauce
Since you’re adding fresh dairy products, including thick yogurt and half-and-half, to a hot mixture, it’s important to follow these steps so the dairy can incorporate perfectly into the sauce without curdling:
after the cooking time is done, turn off the slow cooker
remove the lid and allow the mixture to stop steaming and simmering (wait about 10 minutes)
gently stir in the yogurt and the half-and-half

The slow cooker does most of the work here, but you could prep all of the ingredients 1-2 days in advance so that, when it comes time to make it, all you’d need to do is dump everything in the slow cooker. You can slice the onions, chop the pepper and carrots, and measure all of the spices ahead of time.
Yes, you could prep all of the ingredients (except for the yogurt and half-and-half) and store them together in a freezer-safe container or bag; label and freeze for up to 3 months. When it comes time to cook, thaw the frozen bag of ingredients for several minutes under warm running water, then dump it in a slow cooker. (Alternatively, you could move the frozen bag to the refrigerator to thaw there for 24 hours before cooking). Cook as directed in the slow cooker, and add the yogurt and half-and-half during the last step.
This recipe includes ingredients from several food groups (aka more nutrients!) and makes a nutritionally balanced meal so I feel great about feeding this to my family. While it may sound from the name that this dish is loaded with butter, it uses only 1 tablespoon to add a velvety richness to the sauce keeping the saturated fat low at just 3 grams per serving making it a great option for health-conscious eaters.

How to Serve
This Indian Butter Chicken recipe, like so many creamy and delicious Indian-inspired recipes, tastes great when serve over a grain, such as rice, and with some key garnishes.
Cooked rice or quinoa (see our method here for cooking perfect jasmine rice in the Instant Pot)
Naan flatbread
For a grain-free dish, serve this butter chicken over cauliflower rice
Perfect garnishes: We like to add fresh cilantro, a squeeze of lime juice, and toasted sesame seeds.
Want to save this recipe?
Enter your email below & we’ll send it straight to your inbox. Plus you’ll get great new recipes from us every week!
Recipe
Crockpot Butter Chicken
Make a favorite takeout dish at home right in your slow cooker! Serve it over cooked rice or steamed cauliflower rice and serve it with fresh cilantro, naan, sesame seeds, and a squeeze of lime for a satisfying dinner every time.
Prep: 20 minsCook: 4 hours, 30 mins (high), 6 hours, 30 mins (low)Total: 4 hours, 50 mins
Servings: 6–8 servings 1x
1x2x3x
Ingredients
2 medium yellow onions, peeled, cut in half, and sliced (~13 oz)
2 lbs boneless skinless chicken breast, cubed
1 medium red bell pepper, diced
3 medium carrots, diced (5-6 oz)
1 (15-oz) can tomato sauce
1 (6-oz) can tomato paste
Juice of ½ lemon
2 garlic cloves, minced
1 tablespoon minced fresh ginger (~2-inch piece)
3 tablespoons curry powder
2 teaspoons garam masala
½ teaspoon fine salt
1 tablespoon salted butter, chilled, cut into pieces
½ cup plain Greek yogurt (whole, low-fat, or fat-free)
½ cup half-and-half
Optional for serving: cooked white rice or cauliflower rice, naan, chopped fresh cilantro, lime wedges, and/or toasted sesame seeds
Instructions
Slow Cooker/Crockpot Directions
In the crock of a 6-quart or 8-quart slow cooker, place the sliced onions.
In a large bowl, combine the chicken, bell pepper, carrots, tomato sauce, tomato paste, lemon juice, garlic, ginger, curry powder, garam masala, and salt; toss until well combined.
Add the saucy chicken mixture to the slow cooker over top of the sliced onions.
Dot the pieces of butter over top of the mixture.
Place the lid on the slow cooker and cook on high for 4 ½ hours or on low for 6 ½ hours.
After the time is up, remove the lid, stir all ingredients until well combined, and turn off the slow cooker. When the liquid stops simmering and steaming (after 5-10 minutes), stir in the yogurt and the half-and-half. (NOTE: If you stir in the yogurt and half-and-half before letting the mixture cool down a little, it could curdle.)
Serve over hot cooked rice or cauliflower rice, and/or with naan bread, and garnish with chopped fresh cilantro and toasted sesame seeds.
Stovetop Directions
Place a large pot or Dutch oven over medium heat. Add 2 teaspoons olive oil to the pot and swirl to coat.
When the oil is hot, add the onions, bell pepper, and carrots. Cook for 7-8 minutes or until the veggies are tender, stirring occasionally.
Add the chicken, spices, tomato sauce, tomato paste, and 1 cup water. Dot with the butter and cover with a lid.
Simmer until the chicken is cooked through, about 20 minutes.
When the chicken is cooked through, remove the lid, stir all ingredients until well combined, and turn off the heat. When the liquid stops simmering and steaming (after 5-10 minutes), stir in the yogurt and the half-and-half. (NOTE: If you stir in the yogurt and half-and-half before letting the mixture cool down a little, it could curdle.)
Serve over hot cooked rice or cauliflower rice, and/or with naan bread, and garnish with chopped fresh cilantro and toasted sesame seeds.
Instant Pot Directions
Place the onions, chicken, bell pepper, carrots, tomato sauce, tomato paste, lemon juice, garlic, ginger, curry powder, garam masala, salt, and butter into the inner pot of the Instant Pot. Stir until well mixed.
Add ½ cup of water to the chicken mixture and stir again until everything is combined and there is some of the saucy liquid under the ingredients at the bottom of the Instant Pot.
Place the lid on the Instant Pot and lock into place. Cook on high pressure for 10 minutes. When the cooking time is up, quick release the pressure and remove the lid. Stir well to allow the steam to escape.
Let the butter chicken sit in the Instant Pot to cool for 10 to 15 minutes, stirring occasionally to allow more steam to escape. This is important to let the mixture cool 10 to 15 minutes so the yogurt doesn’t curdle when you stir it in.
After 10 to 15 minutes, stir in the yogurt and half and half.
Serve over hot cooked rice or cauliflower rice, and/or with naan bread, and garnish with chopped fresh cilantro and toasted sesame seeds.
Last Step! Please leave a review and rating letting us know how you liked this recipe! This helps our business thrive so we can continue providing free recipes and high-quality content for you.
Notes
It’s important to allow the cooked chicken mixture to cool a bit before adding the yogurt otherwise the yogurt may curdle. If it does, it’s still fine to eat but the texture may not be quite as creamy.
Nutrition Information
Serving Size: 1/6 of the recipe (1 1/3 cups)Calories: 298Fat: 6g(Sat Fat: 3g)Sodium: 415mgCarbohydrate: 21g(Fiber: 4gSugar: 13g)Protein: 38gCholesterol: 99mg
Dietary
Did you make this?
We love seeing what you made! Tag us on Instagram @therealfooddietitians
h3{flex:0 0 100%}.tasty-recipes-equipment .tasty-link-card{flex:0 0 50%;padding:1.5rem 1rem;text-align:center}@media screen and (min-width:500px){.tasty-recipes-equipment .tasty-link-card{flex:0 0 33%}}.tasty-recipes-equipment .tasty-link-card p{font-size:1em;font-weight:700;margin-bottom:0}.tasty-recipes-equipment .tasty-link-card p a{color:initial}.tasty-recipes-equipment .tasty-link-card span{font-size:.9em}.tasty-recipes .tasty-recipes-nutrition ul{list-style-type:none;margin:0;padding:0}.tasty-recipes .tasty-recipes-nutrition ul:after{clear:both;content:” “;display:block}.tasty-recipes .tasty-recipes-nutrition li{float:left;list-style-type:none;margin-bottom:0;margin-left:0;margin-right:16px}.tasty-recipes-plug{align-items:center;display:flex;flex-wrap:wrap;justify-content:center;margin-bottom:1em;text-align:center}.tasty-recipes-plug a{box-shadow:none;text-decoration:none}.tasty-recipes-plug a img{background:transparent;box-shadow:none;display:inline-block;height:auto;margin:5px 0 0 8px;padding:0;width:150px}.tasty-recipes-footer-content{padding:1.5em;text-align:center}.tasty-recipes-footer-content .tasty-recipes-footer-copy{margin-left:0}.tasty-recipes-footer-content img,.tasty-recipes-footer-content svg{width:60px}.tasty-recipes-entry-content .tasty-recipes-entry-footer h3{font-size:1.25em;margin:0 0 .25em;padding:0}.tasty-recipes-entry-footer p{font-size:.75em;margin:0}.tasty-recipes-entry-footer p a{border-bottom:none;box-shadow:none;text-decoration:underline}.tasty-recipes-flash-message{background-color:#fff;border-radius:4px;box-shadow:0 .3px .4px 0 rgba(0,0,0,.024),0 .9px 1.5px 0 rgba(0,0,0,.05),0 3.5px 6px 0 rgba(0,0,0,.1);color:#313135;display:inline-block;font-size:13px;letter-spacing:0;line-height:1.2em;margin-left:10px;padding:4px 10px}@media screen and (min-width:500px){.tasty-recipes-flash-message{padding:4px 10px}}.tasty-recipes-flash-message p{margin:0;padding:0;text-transform:none}@media screen and (min-width:500px){.tasty-recipes-footer-content{align-items:center;display:flex;justify-content:center;padding:1.5em 0;text-align:left}.tasty-recipes-footer-content .tasty-recipes-footer-copy{margin-left:.8em}}@media print{.tasty-recipes-no-print,.tasty-recipes-no-print *{display:none!important}}[data-tr-ingredient-checkbox]{cursor:pointer;list-style-position:outside;list-style-type:none!important;margin-left:0!important}[data-tr-ingredient-checkbox] .tr-ingredient-checkbox-container{position:relative}[data-tr-ingredient-checkbox] .tr-ingredient-checkbox-container input[type=checkbox]+label{display:inline-block;position:relative;vertical-align:middle}[data-tr-ingredient-checkbox] .tr-ingredient-checkbox-container input[type=checkbox]{clip:rect(1px 1px 1px 1px);clip:rect(1px,1px,1px,1px);height:1px;overflow:hidden;position:absolute!important;width:1px}[data-tr-ingredient-checkbox] .tr-ingredient-checkbox-container input[type=checkbox]+label:before{border:1px solid;border-radius:2px;content:””;display:inline-block;height:20px;margin-right:10px;position:relative;width:20px}[data-tr-ingredient-checkbox] .tr-ingredient-checkbox-container input[type=checkbox]:checked+label:after{border-bottom:2px solid;border-left:2px solid;content:””;display:inline-block;height:6px;left:4px;position:absolute;top:4px;transform:rotate(-45deg);width:12px}[data-tr-ingredient-checkbox] .tr-ingredient-checkbox-container input[type=checkbox]:focus+label:before{box-shadow:0 0 8px #5e9ed6;outline:1px solid #5d9dd5}[data-tr-ingredient-checkbox=checked]{opacity:.8;text-decoration:line-through}.tasty-recipes-cook-mode__container{align-items:center;display:flex;line-height:100%}.tasty-recipes-cook-mode__container label{font-size:inherit}.tasty-recipes-cook-mode__switch{display:inline-block;height:17px;margin-right:10px;position:relative;width:30px}.tasty-recipes-cook-mode__switch-slider{background-color:#737373;bottom:0;cursor:pointer;display:block;left:0;opacity:.4;position:absolute;right:0;top:0;transition:.4s}.tasty-recipes-cook-mode__switch-slider:before{background-color:#fff;bottom:2px;content:””;height:13px;left:2px;position:absolute;transition:.4s;width:13px}.tasty-recipes-cook-mode__switch input{display:none}.tasty-recipes-cook-mode__switch input:checked+span{opacity:1}.tasty-recipes-cook-mode__switch input:checked+span:before{transform:translateX(13px)}.tasty-recipes-cook-mode__switch-round{border-radius:34px}.tasty-recipes-cook-mode__switch-round:before{border-radius:50%}.tasty-recipes-cook-mode__label{font-weight:700}@media only screen and (max-width:767px){#shop-with-instacart-v1{transform:scale(.75);transform-origin:top left}}
]]>span:not([data-tr-checked]) .tasty-recipes-rating-solid svg{–tr-star-opacity:.4;opacity:var(–tr-star-opacity)}[data-tr-default-rating]>span:not([data-tr-checked]) .tasty-recipes-rating-outline svg{fill:url(#tasty-recipes-clip-0)}[data-tr-default-rating] span[data-tr-checked]~span .tasty-recipes-rating-solid svg{fill:currentColor;–tr-star-opacity:1}[data-tr-default-rating] span[data-tr-checked]~span .tasty-recipes-rating-outline svg{fill:currentColor}input.tasty-recipes-rating:checked~span .tasty-recipes-rating-solid svg{fill:currentColor;–tr-star-opacity:1}input.tasty-recipes-rating:checked~span .tasty-recipes-rating-outline svg{fill:currentColor}@media only screen and (min-width:1024px){.tasty-recipes-ratings-buttons:hover span .tasty-recipes-rating-solid svg{–tr-star-opacity:.4!important;opacity:var(–tr-star-opacity)}.tasty-recipes-ratings-buttons:hover span .tasty-recipes-rating-outline svg{fill:url(#tasty-recipes-clip-0)!important}.tasty-recipes-ratings-buttons:hover>:hover .tasty-recipes-rating-solid svg,.tasty-recipes-ratings-buttons:not(:hover)>input:checked~span .tasty-recipes-rating-solid svg,.tasty-recipes-ratings-buttons>:hover .tasty-recipes-rating-solid svg,.tasty-recipes-ratings-buttons>:hover~span .tasty-recipes-rating-solid svg{fill:currentColor!important;–tr-star-opacity:1!important}.tasty-recipes-ratings-buttons:hover>:hover .tasty-recipes-rating-outline svg,.tasty-recipes-ratings-buttons:not(:hover)>input:checked~span .tasty-recipes-rating-outline svg,.tasty-recipes-ratings-buttons>:hover .tasty-recipes-rating-outline svg,.tasty-recipes-ratings-buttons>:hover~span .tasty-recipes-rating-outline svg{fill:currentColor!important}}.tasty-recipes-static-tooltip{background-color:#000;border-radius:4px;color:#fff;font-size:.9rem;opacity:0;padding:5px 10px;position:absolute;text-align:center;transition:opacity .5s ease-in-out,visibility .5s ease-in-out,transform .5s cubic-bezier(.71,1.7,.77,1.24);vertical-align:middle;visibility:hidden;width:230px;z-index:9}.tasty-recipes-static-tooltip.opened{opacity:1;transform:translateY(-4px);visibility:visible}.tasty-recipes-static-tooltip a{color:#f7d578;display:block}.tasty-recipes-static-tooltip:after{border-left:6px solid transparent;border-right:6px solid transparent;border-top:6px solid #000;bottom:-6px;content:””;font-size:0;left:calc(50% – 4px);line-height:0;pointer-events:none;position:absolute;transform:translateZ(0);transition:opacity .2s ease-in-out,visibility .2s ease-in-out,transform .2s cubic-bezier(.71,1.7,.77,1.24);width:0;z-index:99}.tasty-recipes-static-tooltip.tr-hide-tail:after{display:none}.tasty-recipes,.tasty-recipes-quick-links,.tasty-recipes-ratings,.wp-admin .tasty-recipes-comment-form{–tr-star-size:18px;–tr-star-margin:3px}.tasty-recipes-rating,.tasty-recipes-ratings-buttons{color:#f2b955;color:var(–tr-star-color,#f2b955)}.tasty-recipes-comment-form{border:none;margin:0;padding:0}.tasty-recipes-comment-form.tasty-recipes-ratings{display:block}.tasty-recipes-entry-header div.tasty-recipes-rating p,.tasty-recipes-rating-stars,.tasty-recipes-ratings,.tasty-recipes-ratings-buttons{display:inline-flex}.tasty-recipes-entry-header div.tasty-recipes-rating p span.tasty-recipes-rating,.tasty-recipes-rating-stars span.tasty-recipes-rating,.tasty-recipes-ratings span.tasty-recipes-rating,.tasty-recipes-ratings-buttons span.tasty-recipes-rating{cursor:pointer;display:inline-block;font-size:var(–tr-star-size,1.1em);margin:0;padding-right:var(–tr-star-margin,.3em)}.tasty-recipes-entry-header div.tasty-recipes-rating p span.tasty-recipes-rating:first-child[data-rating=”5″],.tasty-recipes-rating-stars span.tasty-recipes-rating:first-child[data-rating=”5″],.tasty-recipes-ratings span.tasty-recipes-rating:first-child[data-rating=”5″],.tasty-recipes-ratings-buttons span.tasty-recipes-rating:first-child[data-rating=”5″]{padding-right:0}.tasty-recipes-entry-header div.tasty-recipes-rating p{display:flex;justify-content:center}.tasty-recipes-ratings-buttons{flex-direction:row-reverse}.tasty-recipes-ratings-buttons input[type=radio]{clip:auto;cursor:pointer;display:inline-block!important;height:auto;margin:0;margin-left:calc((var(–tr-star-size, 1.1em) + var(–tr-star-margin))*-1);opacity:0;position:relative;width:1.1em!important;width:calc(var(–tr-star-size, 1.1em) + var(–tr-star-margin))!important;z-index:2}.tasty-recipes-ratings-buttons>span{position:relative}.tasty-recipes-ratings-buttons>span i{font-style:normal}.tasty-recipes-ratings-buttons>span:first-child{padding-right:0!important}.tasty-recipes-rating a,.tasty-recipes-rating a:link{background:none;outline:none;text-decoration:none}.tasty-recipes-screen-reader{clip:rect(1px,1px,1px,1px);word-wrap:normal!important;border:0;-webkit-clip-path:inset(50%);clip-path:inset(50%);height:1px;margin:-1px;overflow:hidden;padding:0;position:absolute;width:1px}.tasty-recipes-rating-link{align-items:center;display:inline-flex}.tasty-recipes-rating-link .rating-label{font-size:80%;padding-left:.4em}.tasty-recipes-selected-minimum-rating .comment-form-comment label .required{display:none}.tasty-recipes-has-ratings{text-decoration:none!important}
]]>
The photos in this blog post were taken by Rachel Cook of Half Acre House.
For ultimate success, we highly recommend reading the tips in the full blog post above. All photos and content are copyright protected. Please do not use our photos without prior written permission. If you wish to republish a recipe, please rewrite the recipe in your own unique words. Link back to the source recipe here on The Real Food Dietitians. Thank you!

